Search This Blog

Sunday, November 10, 2019

Chilly Day Chili

Chili 


Ingredients

  • 1 pounds ground beef
  • 2 onions, chopped
  • 2 cloves garlic, minced
  • 2 tablespoons chili powder
1 teaspoon cayenne pepper
1 tablespoon cumin
  • 1 teaspoon dried oregano
  • 2 (14.5 ounce) cans stewed tomatoes
  • 1 can rotel
  • 1 small can tomato paste
  • 1 (15 ounce) can tomato sauce
  • 3 (15 ounce) can chili beans with liquid
  • 2 cups bone broth
  • salt to taste (usually about 1 teaspoon)

Directions


  1. Combine ground beef, onion, and garlic in large stockpot. Cook and stir over medium heat until beef is brown. Drain.
  2. Stir in chili powder, salt, oregano, tomatoes, and tomato sauce; break up tomatoes while stirring. Heat to boiling, reduce heat to simmer, and cover. Cook, stirring occasionally, for 1 hour.


I've made chili twice this season so far.  It's great to eat all week and take some to freeze for later.  It's also good with pasta noodles for Cincinnati chili.  

Wednesday, March 6, 2019

It's been a LONG LONG winter.

As I awoke this morning (and again it was only 3 degrees) I felt extremely grateful for the warm cozy house.  I awoke a little after 4, way before my alarm.  I wasn't sleepy so I popped out of bed, fed the animals and made some coffee.  The house was quiet, all but the humming of the furnace and the squawk of the girl cat, who was ready to be fed.

As I ventured to put the news on with coffee in hand. I reflected that today is the beginning of Lent.  I had pondered recently that I've been purchasing a lot online and without much thought and perhaps a hold on un-necessary purchases might be what I should give up.  Would that be too difficult?  Who's to say...I think it might.  Feeling already grateful for being so cozy and feeling a longing for springtime I thought maybe I'd just try to be more grateful for what I already have and often take for granted.

As the sun began to flood the sky, and hearing the news we may have another 3 to 5 inches of snow tomorrow; I became extremely grateful for the blinding sun and the little warmth it was giving off through the window as I was getting ready to leave for work.  Well, at least it's sunny!  Rushing about and trying to get moving out the door, my husband and I decided that carpooling today didn't make sense.  I jumped in my car, which I hadn't driven in a while, and realized it had a full tank of gas!  So grateful to have a full tank of gas on this cold winter day.

When did I become so happy to have these things that I usually probably don't even notice?  Well, maybe it's what I should do for lent?  I don't know.  As I am driving to work, I -again for the 100th time this winter- thank the stars for the wonderful gloves I am wearing.  The steering wheel is very cold even though we are lucky enough to park in a garage.  How long have I had these gloves?  I think maybe I got them for Christmas two years ago.  I really should make a point of telling my in-laws how much I appreciate these wonderful leather gloves, lined with cashmere for warmth but useful with tech touch fingers.  I'm getting so much use out of them this winter.

Can I actually keep this up?  The gratefulness?  47 days of lent if you count Sundays.  Maybe being happy with what I have will keep me from making mindless purchases after all.

Saturday, October 6, 2018

Roasted Butternut Squash Soup

Roasted Butternut Squash Soup is a cold-weather staple! We love this silky butternut soup served with spicy roasted chickpeas for extra flavor. Vegan, Vegetarian, and T-Rex toppings available, so there's something for everyone! Recipe yields approx. 4 bowls or 6-7 cups of soup.
PREP TIME 10 MINUTEs

cOOK TIME 50 MINUTES
TOTAL TIME 1 HOUR
SERVINGS 6 SERVINGS

Ingredients

  • 1 butternut squash (approx. 2.5 pounds)
  • 3 large carrots
  • 1 onion (white or yellow)
  • 1 TBSP avocado oil (or favorite healthy oil)
  • 1/2 tsp salt
  • 1/4 tsp pepper
  • 1/4 cup water
  • 2 TBSP unsalted butter
  • 3 cloves garlic smashed + minced
  • 3 cups vegetable broth
  • additional salt + pepper to taste

SPICY ROASTED CHICKPEAS

  • 15 oz canned chickpeas
  • 1 TBSP avocado oil (or favorite healthy oil)
  • 1/4 tsp sea salt
  • 1/4 tsp smoked paprika
  • 1/4 tsp ground cayenne pepper
  • 1/4 tsp garlic powder
  • 1/8 tsp ground cumin
  • 1/8 tsp black pepper

Instructions

  1. Pre-heat oven to 375 degrees F. Make sure you have two large rimmed baking sheets handy as well as a blender.
  2. Drain and rinse your chickpeas and place on a stack of paper towels to dry a bit. The drier the chickpeas the crispier they'll get in the oven. Woot!
  3. Cut your squash in half lengthwise and scoop out the seeds. Pierce skin of squash a few times with a knife. Peel and cut your carrots into 3 portions. Peel onion and cut into 8 quarters.
  4. Place your squash (cut side down), carrot, and onion on a large rimmed baking sheet (or roasting pan). Drizzle with 1 TBSP oil (extra if desired) and season with 1/2 tsp salt and 1/4 tsp pepper. Pour 1/4 cup of water over the squash. (it will evaporate as the squash roasts)
  5. Pat chickpeas dry and add to your second baking sheet. Drizzle with 1 TBSP oil and season with 1/4 tsp salt. (The rest of the spices will be added after)
  6. Place both pans on the center rack in your oven and roast. Chickpeas will be done at 30 minutes and the squash and veggies will be done after 45-50 minutes.
  7. While your veggies roast, combine spicy chickpea seasoning in a small bowl: paprika, cayenne, garlic powder, cumin, black pepper. Set aside and once chickpeas are done roasting, sprinkle with the seasoning blend, mix 'em up, and set aside. They will crisp up more as they cool!
  8. In a medium-large pot, melt 2 TBSP butter over medium heat. For extra flavor, let's brown the butter first to add some nutty flavor to our soup! Let your butter melt untouched, then once it starts to simmer and brown, add minced garlic and whisk constantly until butter is golden and fragrant. Add your vegetable broth, cover, and reduce heat to low.
  9. Once your squash is ready, allow to cool enough t handle, then peel off the skin of the butternut. Alternatively you can scoop the squash out with a spoon.
  10. Working in batches, blend the veggies with the broth in your blender until silky. I was able to add half the veggies and half the broth and get it all blended in 2 batches. Filling blender only 2/3 full is best as hot liquid expands.
  11. Return the soup to your pot and mix well. Add any additional seasoning to taste and feel free to add extras like nutmeg, allspice, cayenne pepper, etc... Keep covered over lowest heat setting until ready to serve. 
  12. Dive in while it's hot and top soup with seasoned chickpeas and your choice of toppings from the notes below. I like mine with chickpeas, scallions and a teeny drizzle of cream!

Recipe Notes

VEGAN TOPPINGS: roasted pepitas, toasted pecans, croutons, chopped scallions or chives, cashew cream, and/or hot sauce
VEGETARIAN TOPPINGS: heavy cream or sour cream, grated cheddar or parmesan cheese, etc...
T-REX TOPPINGS: You're welcome to top the soup with crispy bacon if you're jonesin' for some. Vegetarians can opt for vegan bacon bits as well! Chicken broth may be used in place of veg broth if needed.
For a vegan soup, replace the butter with oil, to taste.
Using an immersion blender in place of a blender? Cut your carrot into smaller pieces for roasting (so they soften more and blend more easily) and make sure you're using an extra large pot to blend the soup in to prevent splashing.

Monday, June 5, 2017

I really want to try this...posting it here for later.

CARDAMOM-YOGURT MOUSSE WITH MANGO

Serves 6 - 8

INGREDIENTS

  • 3 large mangoes, cut into chunks
  • 2 teaspoons powdered gelatin
  • 1/3 cup honey
  • 1 teaspoon vanilla extract
  • 2 large egg whites
  • 3/4 cup heavy cream
  • 1 1/2 cups plain Greek yogurt (low-fat or full-fat)
  • 1/2 teaspoon cardamom powder
  • pinch salt
  • 1/4 cup toasted, unsweetened coconut
  • 1/4 cup unsalted, shelled pistachios

INSTRUCTIONS

  1. Add the mango chunks to a medium saucepan and cook over medium heat until soft and slightly jammy with some large chunks remaining. This step is optional; if you prefer you can use fresh mango.
  2. Pour 1/4 cup water into a small saucepan. Sprinkle gelatin over the water and left set aside for 5 minutes to allow the gelatin to soften.
  3. Set the pan over medium heat and whisk until the gelatin is dissolved, about a minute. Add the honey and vanilla and continue to heat until honey has thinned.
  4. In the bowl of a stand mixer fitted with whisk attachment, or using a handheld mixer, whip the egg whites until stiff peaks form. Transfer to another bowl and set aside.
  5. Add cream to the bowl of your mixer and whip until stiff peaks form. Add the yogurt and whip until combined. Beat in the cardamom (add more, to taste) and pinch of salt.
  6. Slowly pour in the warmed honey and gelatin mixture and whip to combine. The mixture may seem slightly runny at this point; this is okay.
  7. Gently fold in the egg whites then spread or scoop the mousse into six separate cups. Refrigerate for 2-3 hours or until softly set.
  8. Garnish with mango, toasted coconut, and pistachios, or other toppings of your choice.

Friday, March 31, 2017

Gluten Free Ravioli


I saved this recipe on facebook that happened to show up in my feed.  It was much easier than I expected and everyone went ga ga over it.  My son had 3 helpings and I even had left overs for lunch the next day.  I think you could do this with other toppings and fillings with some success.


Zucchini Ravioli

Ingredients


  • 4 medium zucchini
  • 2 cups whole milk ricotta
  • ½ c. grated parmesan, plus more for garnish
  • 1 egg
  • handful of chopped chives
  • 2 Garlic cloves, minced
  • kosher salt
  • Freshly ground black pepper
  • 1½ c. marinara sauce (I used Rao's)
  • ½ c. shredded mozzarella

Instructions


  1. Mix ricotta, Parmesan, egg, chives,garlic, salt and pepper together, Set aside.
  2. Preheat oven 375.
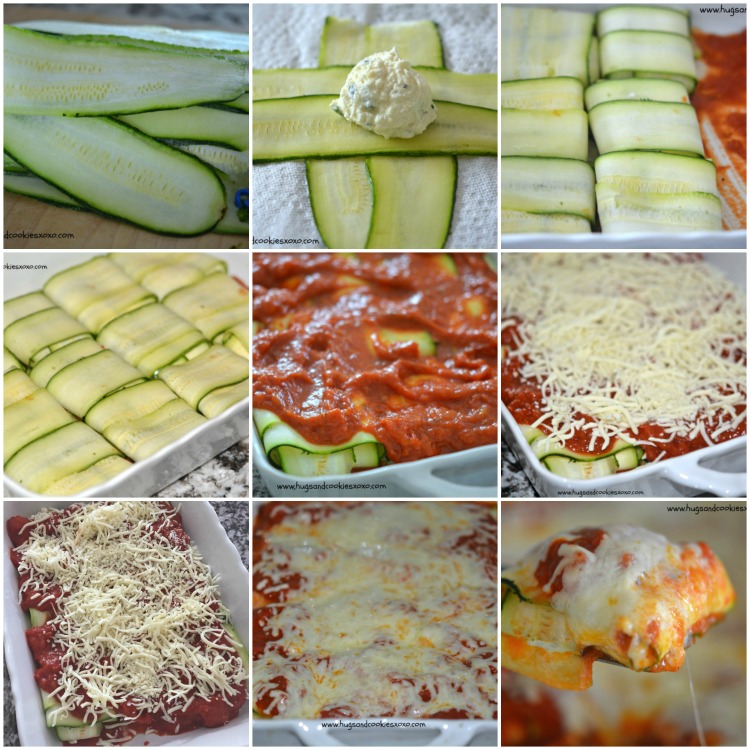
  3. Pour a bit of the sauce on the bottom of a 9x13 dish to prevent sticking.
  4. Slice the zucchini with a veggie peeler lengthwise. Pat dry to absorb extra moisture. (this was a bit tricky...I think if I use a mandoline I would need less zucchini...one has been ordered from amazon and is on the way.
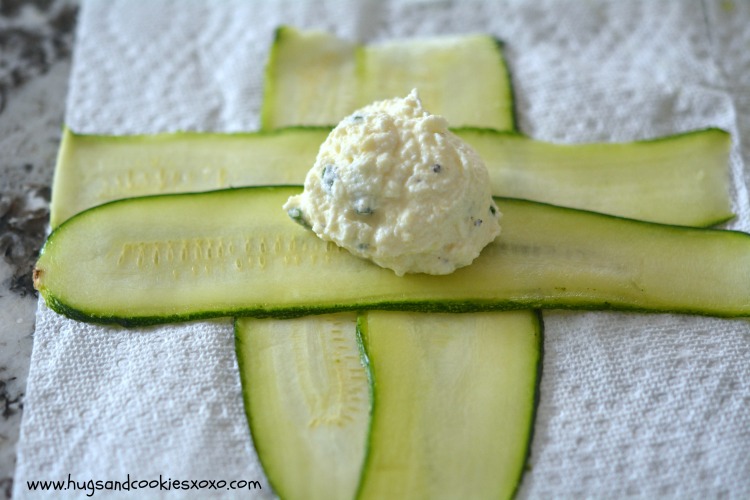
  5. Lay 2 slices vertical so they overlap and 2 across those.
  6. Scoop some of the cheese mix into the center and fold all ends into the center.
  7. Lie them seam side down in dish.
  8. Top with sauce and cheese.
  9. Bake 25-30 minutes.
  10. Remove and sprinkle on more Parmesan.